Preserved from CalaisTurbo. Original authors and dates are shown; archived members are not current Holdcom accounts.
26-09-11, 14:43 GMT+10#41 Got your email mate, sent you a reply
Car is looking tough as. I can't wait to see it finished.
Some original photos have not been recovered yet.
0 likes
26-09-11, 14:59 GMT+10#42 Hey Luke,
Thanks for the reply mate! If only everyone in this industry was as easy to work with!!!!
Will have some photos for you soon of the catch can/breather set up! Just getting the can modified to clear the bonnet! The braid and fittings are ridiculously awesome though!!!
0 likes
18-10-11, 12:36 GMT+10#44 Bit of an update.
Catch can modification was has been completed. Adam at AGI (www.agi-precision.com.au (http://www.agi-precision.com.au)) sorted it all out for me. The upper outlet for the filter and oil breather baffles were removed from the top of the original setup. A CNC machined threaded outlet and cap were added to the top while a new outlet was fabricated and fitted with the original baffle system to the side of the tank.
Its turned out absolutely awesome!
My cousin and I spent pretty much all of saturday getting the brakes system finished up and in the car...rear's caused abit of a headache as the rotor's needed abit of a 'massage' to clear the diff bolts.
Radiator has been mounted, catch-can has been mounted, fuel log has been mounted, booster has been mounted. Pretty much everything that I could put into the car myself was put it.
UNFORTUNATELY! I left my camera at home! So i've got a few shots from my phone...but that's about it for now!
Here's some pics....I must say...LOVE THE WHITE AERO'S!!!!!
I'll be pulling her out of the garage this weekend and giving her a good wash! Pics will follow!
Next up is getting the brake lines run, undecided on whether I'll be running braided brake line or not? We shall see! From there she's off to AGI to get the fuel tank finalised!
Will keep you all posted!
Some original photos have not been recovered yet.
0 likes
24-11-11, 10:23 GMT+10#45 She's on the move again...off to AGI (www.agi-precision.com.au (http://www.agi-precision.com.au)) to get the fuel system and a few other odds and ends sorted!
Couple of pics of her on the trailer.
Adam was even kind enough to wash her for me!
Will keep you all posted as things progress....
0 likes
25-11-11, 16:13 GMT+10#46 Looks great, rear bar still being modified for twin outlet pipes? Or waiting for tank to be done 1st?
0 likes
02-12-11, 21:11 GMT+10#48 Thanks for the reply boys.
Mo - The rear bar is still with the panel beaters. The rear bar will not be modified for the dual exhaust, I'm going to cut the exhaust tips completely and then weld on a dummy pipe on the left hand exhaust tip. I think this will complete the standard look I'm going for with this car! From the outside and inside it will look like it did when it left HDT all those years ago!
And now for a solid update below...
Over the last 3 days the Brock has been at AGI (www.agi-precision.com.au (http://www.agi-precision.com.au)) getting its fuel tank sorted. Adam is an absolute master! In a space of 3 days he has completely designed and built the tank, including the ordering of parts etc.
Here are some pics of the progress so far...
Initial mock-up
Adam worked though a number of template configurations to maximise capacity within the constraints given. The above tank will hold approx 71L of fuel and still allow me to pull the spare wheel out if ever needed.
You will notice the tabs on the side of the tank above, this indicates the size of the drop down sump that will sit under/middle of the tank.
Fabrication
Inside pics of the tank below. You'll notice the baffles inside the tank which will also hold in place the foam blocks. Between the baffles there is a centre section that allows the fuel level sender to to function without being affected by the baffles.
Inspection plate hole has been cut, we are waiting on a thicker aluminium plate for that piece. The inspection hole will also incorporate the breather tube, return line and fuel level sender.
Pics of the sump under the tank and also the fitting for the fuel line.
And how it sits in the boot of the old girl.
Adam is finishing off the inspection plate next week and also plumbing the entire system. He will also complete the filler pipe. I'll be able to use the original filler point of the car and not have to open up the boot.
Adam, he is an absolute master at what he does! Highly recommend him!
0 likes
16-12-11, 07:30 GMT+10#49 Hey guys,
Thanks for the comments again.
Bit of an update from AGI. Unfortunately Adam has his hands full with alot of other projects, so he gets to my tank when he can. Not really fussed though, gives my bank account time to replenish!
All the parts Adam ordered arrived: aluminium plate, black fittings, gasket material etc, so he spent the majority of the yesturday finishing off my tank.
So here's what Adam knocked up:
- Fabricated lower �nut� plate. This sits underneath the inspection hole and is threaded so that we can secure the top hatch / inspection plate.
- Handmade fuel resistant gasket to seal hatch.
- Fabricated top hatch / inspection plate
- Fitted fuel level sender to hatch plate
- Welded return line inlet fitting and fitted breather valve.
We've ordered som 2 inch aluminium elbows and pipe, this should be there today, so that we can look to connect the filler point to the tank.
While this is happening I've sent my regulator to get anodized black as I'm not a big fan of the blue and purple magnafuel colours.
Will keep you all posted.
0 likes
17-12-11, 07:22 GMT+10#50 So much awesome going on there great work guys
0 likes
17-12-11, 20:40 GMT+10#51 Thanks for the comment mate!
I'm looking forward to seeing the filler pipe complete! Should be something alil different that your usual fuel cell set up!
Will keep you all posted.
0 likes
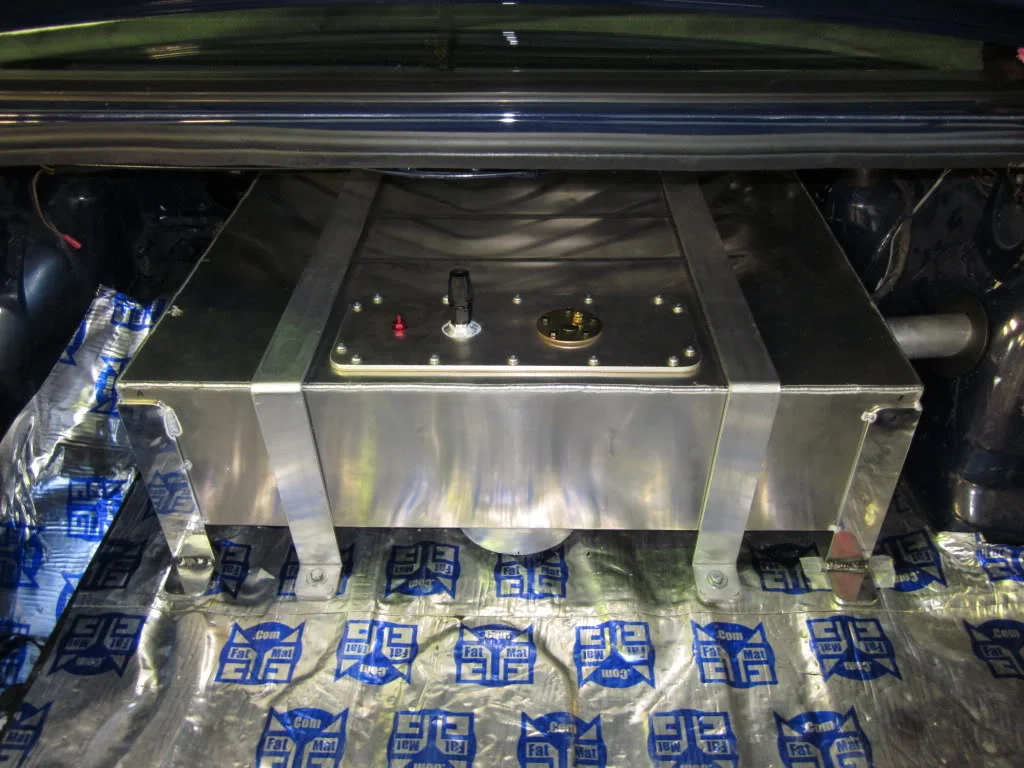
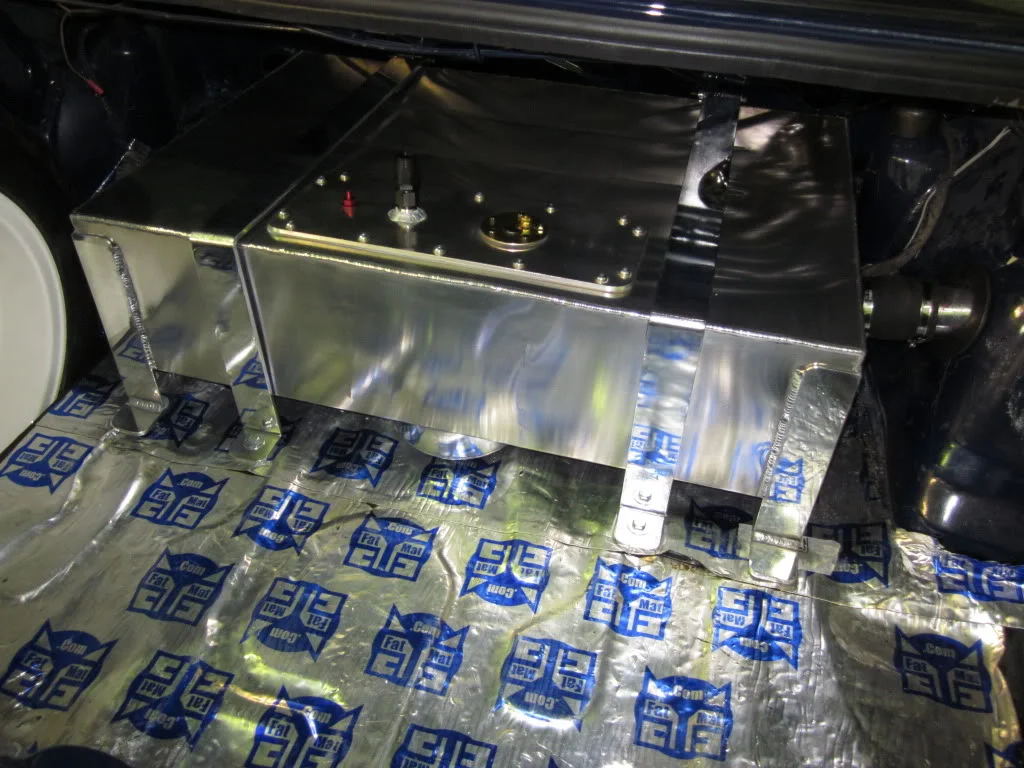
09-01-12, 20:59 GMT+10#52 Sheet Metal Pornography courtesy of Adam at AGI!
My custom fuel cell is finally finished up and man, IT LOOKS ABSOLUTELY AMAZING! Adam has really out done himself with this one! It's definately one of a kind and to be honest its unfortunate that no-one will ever see it as it will be hidden once trimmed!
So here's what we did to finish her off:
- The straps over the tank were fabricated, polished and bolted down.
- The front legs (that keep the sump off the floor and support the tank) were welded up and polished
- The filler pipe was mounted to the side of the tank and original filler point of the car.
Some picks of the final product mounted in the car:
I know some people will be looking at the filler neck and wondering if it will overflow when the tank reaches capacity, I wondered the same thing and to be honest got alil worried that all the time and effort was for nothing.
Adam kind of laughed at me and proceeded to test fill it, it held all 71L and not a single drop escaped the filler point! He later explained that the filler point is higher than the tank itself, so no issues with filling the sucker!
Adam will proceed to plumb the fuel system over the coming week! I've for a few more things up my sleeve for him to do....so keep and eye on this space!
0 likes
31-08-12, 06:59 GMT+10#53 Update time....I can't believe it's been almost 6 months since the last update!
So to be honest not a lot has happened since the last update, however, ALOT is happening at the moment!
So, the fuel system is completely done, which is awesome! Unfortunately no pics of that yet! The car went to Unique Customs to have the scoop and rear bar fitted! Look dead standard! Still needs to go back for its final cut, buff and polish!
Car is currently at Trick and Mansweto who have been g en the instructions that I do not want to see it until its running! So give me 3-4 weeks and I'll have a video of my beloved Brock finally making some noise!!!
Unfortunate my interior guy has decided to pack up and move to Wollongong. It's not only a shame for myself, but also the entire industry. But have had a chat to Darren at Stitched Up and he is very keen to take on the job!
So some pics (I apologise in advance for the qaulity!):
On its way to Exclusive Customs....
At Exclusive...
The morning of her Mansweto trip....
At Trick and Mansweto Racing....
Something awesome and very hard to track down!! My interior will be coping a colour change, something that I have wanted to do since I bought the car and the colour option that I believe the cat should have come with!
Updates will be coming fast for the next few months as I need the car done for my sisters wedding!
Will keep you all posted!
0 likes
12-09-12, 00:00 GMT+10#54 Love it man, was thinking the other day that I hadn't seen any updates in a while.
0 likes
28-10-12, 19:01 GMT+10#55 Very nice,
How did you fit the filter under the bonnet? I thought with that scoop the filter would still be an inch too high still?
0 likes
05-03-13, 13:05 GMT+10#56 So its been ages since I last posted anything, mainly because I completely lost interest in the car and had seriously contemplated selling it.
Thankfully I came to my senses and pulled my finger out and got the ball rolling again.
So it spent MONTHS at Trick and Mansweto, mainly due to the fact that it was there over the christmas break and everyone decided to not do anything! Having said that, I now have the car back and it's been completely re-wired and the manifold has been shaved to keep everything under the standard VK Group 3 scoop.
So my cousin has been tasked with trying to get this thing finished! I just don't have the time anymore to work on it, and he's absolutely keen to do it!
Pics of it in his garage:
Some very intense wiring work, wiring scares the **** out of me so full credit to all the auto electricians out there! My only directive to the electrician was that no wires required in the engine bay were to be seen, non at all! He's killed it and I'm super super happy with the results!!
Pics of the wiring under the dash:
Engine bay, radiator in aswell, same as master and booster:
So the major headache with this car has been the brakes! I've always wanted a quality 4 piston brake package that would let me retain my 16inch Aeros and the standard look I've been going for...who would have through a Skyline would come to my aid!
4 Piston GTS-T brakes under a 16inch Aero!
Had to shave down the holes for the brake pad locater pins to ensure we could secure them....nothing is as easy as they say it is!
The weather cleared up one of the days and we decided to push it out and give it alil clean....
So what's next?
- We have Motorsport Connections coming out in two weeks time to plumb the brakes and fuel lines.
- I'm having custom catch cans and a overflow bottle being made by Adam at AGI. These will all be hidden and out of site.
- The front and rear glass is coming out so the roof lining can come out and more fatmat can be laid.
- The interior plastic is in the process of being painted.
- The interior is in the process of being trimmed.
Deadline....I'm not saying shyte! When it's done......IT'S DONE!!!
0 likes
16-04-13, 10:48 GMT+10#57 Well catch cans have been completed by Adam at AGI Precision. Awesome work as expected!
And as expected they fit perfectly, nice and tight next to the radiator.
I also had Adam weld some threads instead of the locator points at the bottom of the radiator so it now screws to the bottom. Will be welding on some nuts to the side so that I can bolt is down via the sides as well.
I have Motor Sport Connections coming out on Thursday to do the fuel and brake lines. Looking like we should be able to turn her over by the end of the month!
Once she is plumbed ill throw the interior in and then it's all systems go!!
Quick shot of the boys working, while I'm at home scratching my head....
Will keep you posted!!
0 likes
16-04-13, 15:00 GMT+10#58 Car looks mint, loving the catch cans too!
0 likes
18-04-13, 10:16 GMT+10#59 Glad you didnt sell it mate, this is a very special car.
0 likes
18-04-13, 16:40 GMT+10#60 Thanks for the comments guys! I really really appreciate all the feedback!
Ok so update time....
Today Andrew, from MSCN, came and plumbed the fuel system and brake lines! Absolutely stoked! I can now get fuel to the carby and stop the car when I feel like it!
The fuel system is all stainless Teflon, up until the engine bay where I went for black. You will note that there is no return line, this can be found on the fuel pump, this is awesome and doesn't add clutter the the engine bay.
So the only thing I asked of Andrew is that he not drill anymore holes into the engine bay, so he mounted the fuel reg onto the fuel log and added the fuel pressure gauge.
Brake lines are all stainless and are absolutely immaculately bent! Could not have asked for a better job!
So Andrew will be coming back in May to finish plumbing the trans cooler lines and the catch cans....ran out of cash! Always the f****n case! So we are looking good people! Should be good to go before Motorex in July!
Here's a pic of my main man ruining the steering lock! Love this lil
Legend!!!
Starting on the interior this weekend...so pics to follow!!!
Thanks again for the comments guys!
0 likes
