Preserved from CalaisTurbo (partial recovery). Original authors and dates are shown; archived members are not current Holdcom accounts.
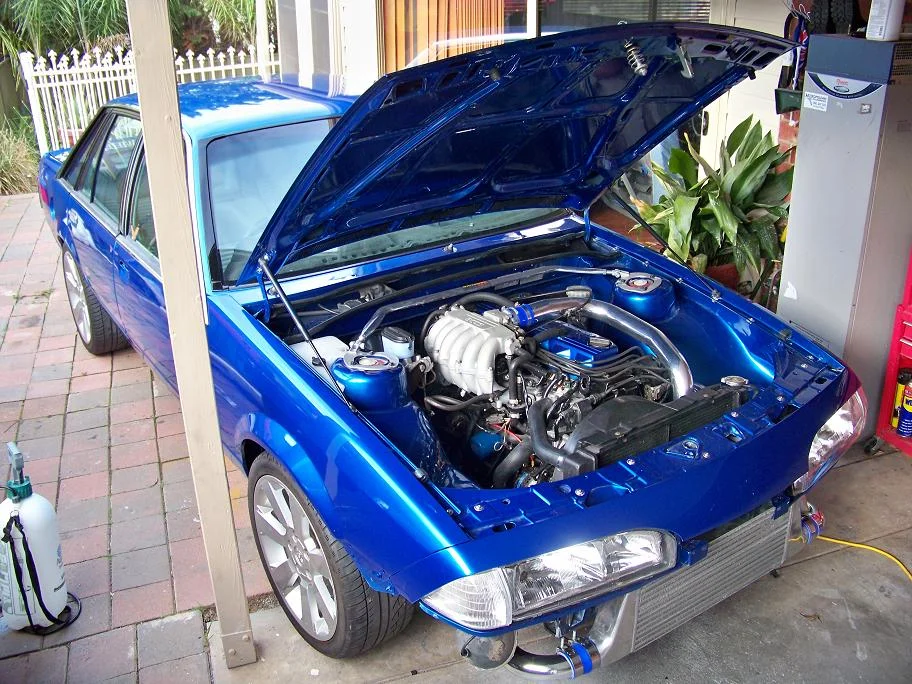
07-06-09, 21:15 GMT+10#141 did you have any trouble mounting the lights cos i reckon mine sit a bit lower than usual cos ya can see the clips that hold the glass in???
looking mint as usual mate.
0 likes
08-06-09, 15:37 GMT+10#142 fark man that looks mint as with the new lights!
0 likes
08-06-09, 16:53 GMT+10#143 cheers all for the words
yer i reckon the car looks so much more clean and chrisp with the lights in myself
Matt nah the lights were fine
did you tighten the top two vertical screws before the bottom two?
as that will draw it up with out being stopped by the bottom two
_____________________________________
well today i headed down to supercheap to take up a special in the catalouge i couldnt say no too
fire extinguser buy one get one free but they had none in stock
so there ordering me a pair, will be a few weeks but not bad for $32
there 1kg with 6year warrenty so if they give me a few secs it will be worth it
comes with metal mounting brackets too
did a little small thing today, got some rubber gromits to make some cable holes neater
mounted the air box fan cover and clipped it in for good
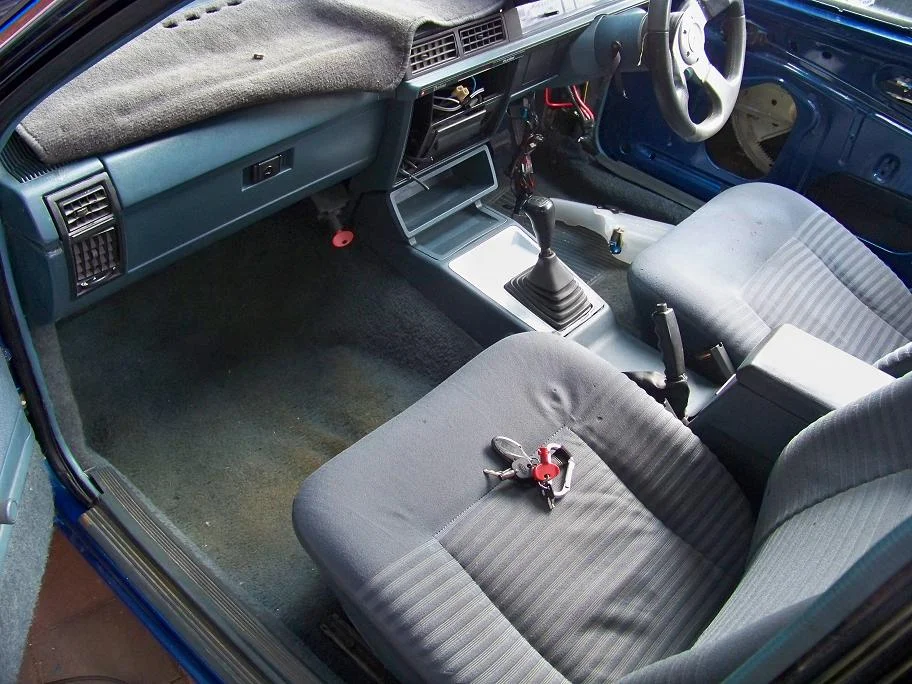
fitted my glove box on
drilled out 3 pop rivets for the trans tunnel panel so i could pop rivet in the console braket i forgot, now the console is mounted in properly
put new full beam globes in also
Daron is coming up tonight too look into the relay problem, so fingers crossed its it
the carpet needs steam cleaning badly, on the list to do
Some original photos have not been recovered yet.
0 likes
11-06-09, 23:10 GMT+10#144 i love it mate, perfect street cruiser
Sometimes I wish I kept mine at this level driveline wise, so much less headaches
Some original photos have not been recovered yet.
0 likes
12-06-09, 18:55 GMT+10#146 Quote:
Originally Posted by 7FOUR7
i love it mate, perfect street cruiser
Sometimes I wish I kept mine at this level driveline wise, so much less headaches
nice clean daily was my orignal goal and i aint too far off i say, besides being a daily part lol
pffft im doing my head in trying to get it run as is
just put all the manifold together tonight and letting the gasket glue dry
tommorow ill put the pipes on and hope it kicks over
although happy i got my injectors cleaned yesterday as one was blocked so saved taking the manifold apart for a 3rd time
cheers VLDUBC
Some original photos have not been recovered yet.
0 likes
17-07-09, 19:05 GMT+10#147 little while since a update but ill try taking off where i left
the manifold was put back together and tryed starting it but no luck
hadnt had much time to touch it really but managed to set the cam timing up good and chucked a new one on while i did it last weekend
still havnt tryed starting it though,
i reckon its all down to the electrics for the running prob
found a scratch on my guard
didnt touch the car in 2 weeks and come back to find it
sanded all my rear bar, and almost all my moulds,
still have fuel flap and need another mould before priming
bought some kenwood KFC P403 4" splits for the dash
brand new in the box for $75
The new kenwood KFC P403 4" splits
Scratch
Rear bar almost fully sanded, just get all the edges by hand
Snail
Random shots from tonight
few shots from the morning it went to autopro (2weeks ago)
washed the night before
might of posted these but dont think so
my favroute out of this set :thumbsup:
Some original photos have not been recovered yet.
0 likes
17-07-09, 19:24 GMT+10#148 that last pic is sweet... new avatar for you me thinks
0 likes
17-07-09, 20:03 GMT+10#149 looks awesome mate spuing bout the scratch thats why i chose to paint engine bay now and the rest of the car later cause im clumsy as haha.
0 likes
18-07-09, 09:56 GMT+10#150 inspirational! i read the whole thread...and im speechless
question on ur running issue...when u extended the AFM loom...did u also extend the wire with the external mesh wire...i can see all the other extensions bar the silver mesh wire...? could be an issue for ur running also
Some original photos have not been recovered yet.
0 likes
27-08-09, 17:28 GMT+10#151 Quote:
Originally Posted by TUXEDO
I saw this car in the flesh yesterday and it really is a nice looking VLT! It will be good to see this thing out on a cruise one day! Congrads mate and cheers for the cat
thanks very much Locky for the word
once its done ill def bring it out
no prob about the cat
Wednesday
well havnt done much as ive been at tradeschool, got it all week and next
leave before sun rise and home just before, so sucks
plus monday and tuesday i was at the misses till 9 then had a 30 minute drive home
so i was pritty spent and still am so im hitting the sack in a sec after this post
but friday we finish at lunch
so plans are along the line of get home at 1 ish,
jack the car up.
tail shaft off
hire a engine crane and pull it out of the wagon,
then start stripping the sedan getting that ready.
jack it up
tail shaft off,
trans off
radiator out
disconnect everything
pull out possibly sat midday
rang the place about the exhaust and got talking too him about the prob
as soon as i said that it was 2.5" and not the 3" he said 'f#%!'
he wrote down 3" in the book but for some reason he said 2.5" to the supplier
he was sorry about it and said he will source a 3" and ill just have to orgernise to get the car back down
plus possibly pay the diffrence in cost which it prob will have, which im cool with
so when the engine is out ive got to remove the dump and front pipe anyway so ill let him refit it all at once and get it lined up perfect
over the weekend if i get time ill swap all my interior parts into the sedan, mix match the best stuff i can make out of the two cars
__________________
Today
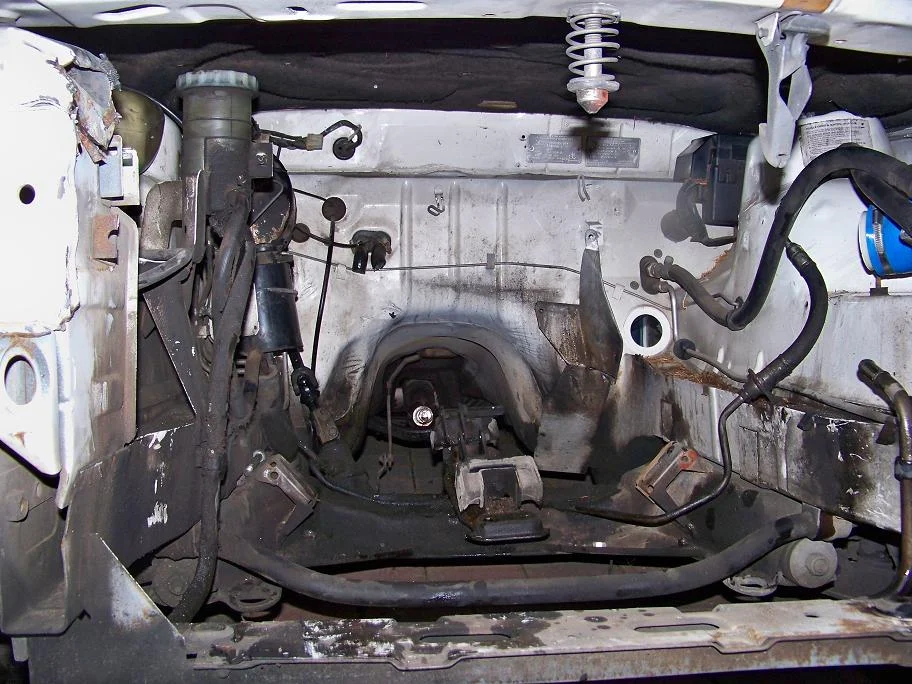
well just made some head way before the rain started
got this sucker out :dance:
came straight out forwards like planned with the trans, so much easyer with no rad support
no probs, got it all disconnected the first time..... practice makes perfect ha
quickly cleaned up all my mess and wrapped the motor up then the rain started,
just made it
Some original photos have not been recovered yet.
0 likes
29-08-09, 19:49 GMT+10#152 Quote:
Originally Posted by legal6
double post merging crap
well bought some stuff today to get under neath the car looking nice
finally got a gun for the 2 bottles of texter coat ive got and a can of brush on sealer to seal over the welds on the spare wheel well
so once the weather in a little warmer ill get the car up and seal every where then spray the rear wheel arches, floor and spare wheel well
0 likes
01-09-09, 06:07 GMT+10#153 well the engie in the blue car is almost set for coming out,
took the trans out last night
just strut brace, power steer lines off the pump, exhaust and the heater hoses to go
0 likes
14-09-09, 21:23 GMT+10#154 nothing major has happened lately,
just a little slow as ive had problems pop up and on the weekend i was in melb for the footy
currently as it sits tonight theengine is in, radiator in
need to do the cabling and few pipes, trans and tailshaft
fluids and fingers crossed
exhaust is booked for the 29th of sep ????? well the friday for long weekend
so the exhaust will be fixed so ill have to get it running by then
then that weekend sat and sunday it will be next door and the side will be repainted and the last parts plus any polishing needed will be done,
then a rush before C4C too make sure all is ready
0 likes
17-09-09, 11:15 GMT+10#155 coming along nice sean
love this berlina
Some original photos have not been recovered yet.
0 likes
20-09-09, 13:59 GMT+10#156 cheers mate
door trims are all changed, now i have immac ones with no cigi burns, few dash pieces changed, passenger front seat belt is in,
did all this while jon was polishing
half of the car is done giving it its first cut
still going to cut it again and glaze it
next sunday will finish cutting it then when exhaust is fixed ill take it into the work so we can glaze it under fluros too see better :wax:
now off to play with the drivetrain :dance:
more pics later
0 likes
20-09-09, 14:55 GMT+10#157 That came up really nice
Colour looks awesome in the sun!
0 likes
20-09-09, 15:29 GMT+10#158 just read your thread, awesome work, love to see it out one day..
0 likes
20-09-09, 20:01 GMT+10#159 thanks jahan and AERO
well just got out the shower and cleaned my self up from my greasy poil trans handling
good 10 hours work done today
what has been polished so far
LH Guard
LH Doors
LH quater panel
Boot lid
so next sunday the rest will be done on (the first cut back)
then once it goes down for the exhaust that night we will take it next door too work and glaze it all under fluros and fit the bar
so we will have to get everything painted by then
and ive got tooo get it running
while Jon was polishing it i did a little on the interor
passenger seatbelt i put in
cleaned and put in the 3 console screw hole covers
replaced the filler panel on the dash behind the sunglasses holder
put in the blower fan controls from the wagon as the cables were not shorting on it
replaced both dash speaker grills, as some had glued vlecro or alike for a dash matt before
cut little slots in the dash matt for the tweeters too get through (near new from wagon )
door trims, now no burns:dance:
then tonight a hit up a little harder work,
flywheel all tightened up
clutch on
trans on
tail shaft on but still need to connect too diff
re-ran the main power cord along rail and speedo cable too neaten it up
connected clutch slaver cylinder too the clutch master
pictures
(door trims pics were taken with my phone so quality is down)
LH F door trim, orignal
also changed the arm rest as mine was lifting a little on the back edge
New trim on and arm rest
RH R door trim, orignal
back edge top fabric was coming off and few little burns
new trim
the artist who painted it and polishing it, Jon
Washie
Clean
Some original photos have not been recovered yet.
0 likes
20-09-09, 20:21 GMT+10#160 those wheels suit it to a tee buddy!
0 likes
